here are even more pics for your perusal


Oh, by the way I found this glass inside this vase during the turn. The scrapes and waste of this style are almost more fun to play with than the original concept.
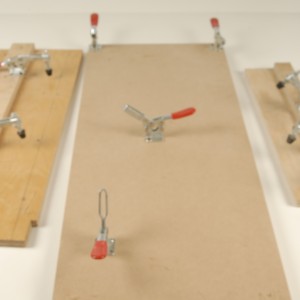
Making these plywood designs


Creating these designs is probably the most difficult wood work I have ever done. It is not in the turning but creating the material. I might spend 8 to 10 hours creating material that takes 30 minutes to turn. Consistency is also a large problem along with minimizing cumulative error in the material. Glue up jigs are a must to keep the glue up from sliding and moving on the triangular matterial.
Running 8 inches of material through 4 inches of table saw blade is a scary proposition. So heads up, if you go down this path you need to be extra carefull. Be sure and count the # of fingers you have before you start. After, if the number is in any way different be sure and tell your wife she was right. An easir solution would be a 12 inch table saw but who can afford that, right?
The problem lies in cutting on the bias. A 45 degree is nice, less is better. A 30 gives you a bigger ‘eye ball’ so to speak as the vessel on the right vs the 45 degree bias on the left. You can see this in the material next to each which are the scraps of the original material.
These vessels are created with 4 pieces with 2, 45 degree cuts each. Allowing the 4 piece construction is trickier to get perfect seams and connections perfect (which gives you the most dramatic look) but the longer slices of the pie make the slopes and curves more dramatic. Of course because you are turning a quarter of the round by the time you come to the end you are into end grain, augh as can be see in this close up. But using a more end grain sensitive matterial (unlike this walnut) can get you the best of both worlds as with the butternut. The benifits with the 4 piece construction are well worth it. the design as the pieces come together is the ‘big wow’ you are looking for. You can get the owl eye look or LA freeway look and and combination thereof depending on how you align the joining ends. It requires experimentation for sure. I often was suprised with what waited for me inside the wood by way of design.
Try it and see if you can have as much fun as I have.
Steve
One thing leads to another


My last posting we talked about some experiments with plywood. Honestly I was not impressed with the results but as in all things one idea takes you to the next thing. In this case it was laminates with segmentation which can be applied is so many ways with so many different variations that the combinations are limited only by your imagination.
Here are some pic’s of where this has taken me.
After i will describe in more detail how to achieve these results so if you like what you see keep reading.
Oats use with plywood on the bias.

Here is the result of the plywood OATS construction with the plywood presented on the bias or end grain view. The walnut turns a rich black when exposed to the blue dye. The plywood veneers are facing out out giving it a race track look.
The use of Dye’s is not preferable wanting to keep things natural and all but with the plywood it helps with the desired effect.
Oats plywood with Walnut


Another dumpster plywood creation is this similar vase. The orientation of the plywood is different however and I have yet to put the dye on.
As you can see the orientation of the plywood makes 3 different vases with entirely different looks.
One horizontal gives the wavy gravy look, next the concentric circle look as the plywood is oriented vertically with the plywood finish facing out and finally the vertical orientation with the interior of the plywood facing out giving it a ‘many lines ‘ look.
Will post pics of the last after finish and dye.
Steve
Oats with walnut and plywood


Still having fun playing with plywood from the dumpster.
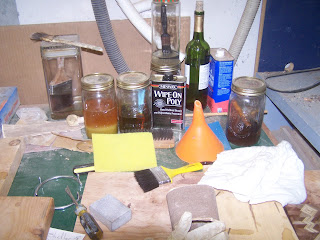
For the first time ever I am experimenting with wood dye. As you can see here I went with red dye in order to accent the layered look of the plywood. This was imspired by some of the work of Stephen Gleasner (He has a website and works with Plywood sculpting). The dye has a way of bringing out the layered look and also every imperfection in the wood.
Here is the result of the plywood OATS construction with the plywood presented on the bias but side view giving it a wavy, layered look.
Finger joinery on the lathe


Some other finger joint designs.
One that is of a different sort.
I did not complete the glue up by keeping the 8 sides from reaching their seated positions against the next piece but rather held them away from each other by a half inch or so.
this gives a spacing which travels at a 45 degree angle from the center of the vase.
When a candle is lit inside the light is thrown at these angles in a soft way making a collection on all the walls of rectangular lighted squares appear all around the room.
If your girl loves candle light this one will make a great Xmas gift.
I used Mahogany and butternut.
Careful don’t lite the place on fire.
Steve
finger joint turning


Here is something that came to mind that i have never seen before.
Combining joinery with turning.
had trouble with the dove tail so stuck with the finger joint.
Used it in an 8 sided box off a special jig i made in my shop.
I really loved the look of it as you can tell.
Its hard to know where one piece ends and another begins.
Lots of fun to play with this design, however the shape is limited.
Only a straight fluted design will work for the body. Also at the end of the fingers you are turning end grain which may or may not need a little help with puddy in the finishing.
Also the glue up is difficult and required a slow setting formula. Tight bond makes a good one.
But the result is well worth the trouble.
Steve
Fun with plywood from a dumpster


Here is something fun and new.
I found a plywood section of an old pallet in the dumpster at Home Depo.
I have used it in a number of experiments.
this one came out kinda nice.
Wavy gravy plywood with cherry and walnut with mahogany bottom and top.
Gives me other better ideas on how to combine this technique with other venues.
Steve
Contact Steve